Spring Cloud: netflix eureka를 사용한 서비스 검색 소개
문제 이해
솔루션의 주요 목적을 완전히 이해하려면 먼저 근본적인 문제를 이해해야 합니다.

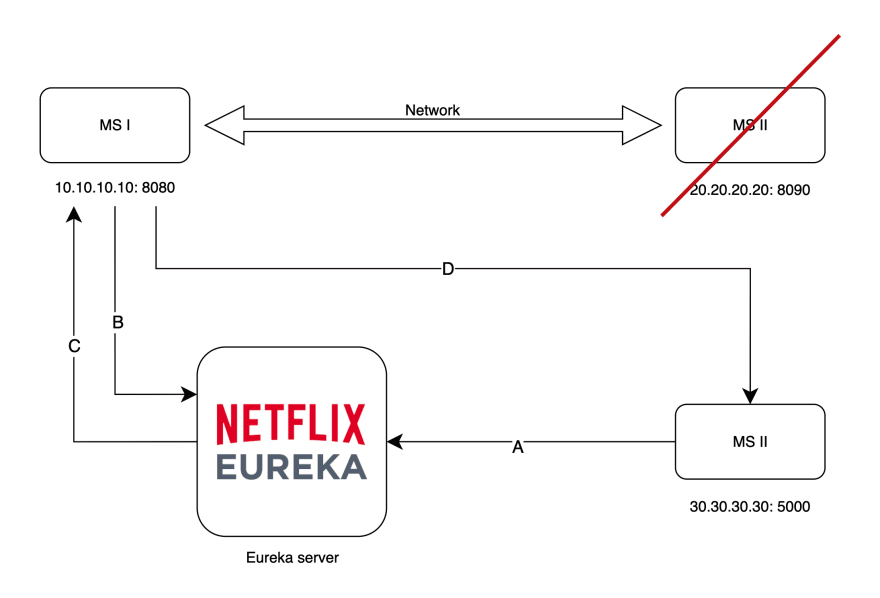
위의 다이어그램에서 볼 수 있듯이 특정 네트워크를 통해 통신하는 마이크로 서비스가 필요합니다.
두 번째 마이크로 서비스가 어떤 이유로 주소와 포트를 변경할 때까지 모두 평화롭게 작동합니다.

결과적으로 마이크로 서비스 I은 새 주소와 포트(30.30.30.30:5000)가 없기 때문에 마이크로 서비스 II와 통신할 수 없습니다.
이 문제를 해결하려면 마이크로 서비스 II의 새 주소와 포트를 마이크로 서비스 I에 수동으로 제공해야 합니다. 자동으로 할 수 있다면 어떨까요?
대답은 '예'이며 Netflix Eureka가 하는 일입니다.
후드 아래의 유레카
MS2가 할 첫 번째 일은 주로 IP, 포트 및 상태(UP 또는 DOWN)를 제공하는 네이밍 레지스트리 서버(Eureka 서버)에 등록하는 것입니다. [ㅏ]
MS1은 MS2 [D]를 호출하기 전에 이름 지정 레지스트리 [B]에서 MS2 좌표를 가져옵니다. 그러면 MS2가 Eureka 서버에 등록하는 시간만큼 위치가 백만 번 변경되더라도 통신이 가능합니다. 서버는 필요한 데이터로 응답합니다. [씨]
또한 명명 레지스트리를 가져오거나 등록하면 마이크로 서비스가 클라이언트(Eureka 클라이언트)가 된다는 점을 이해해야 합니다.

코드로 이야기하자
이 튜토리얼에서는 다음을 사용할 것입니다.
스프링 부트 2.6.2
<parent>
        <groupId>org.springframework.boot</groupId>
        <artifactId>spring-boot-starter-parent</artifactId>
        <version>2.6.2</version>
        <relativePath/> <!-- lookup parent from repository -->
</parent>
자바 8 및 스프링 클라우드 2021.0.0
<properties>
        <java.version>1.8</java.version>
        <spring-cloud.version>2021.0.0</spring-cloud.version>
</properties>
물론 스프링 클라우드 모듈에 대한 종속성 관리
<dependencyManagement>
        <dependencies>
            <dependency>
                <groupId>org.springframework.cloud</groupId>
                <artifactId>spring-cloud-dependencies</artifactId>
                <version>${spring-cloud.version}</version>
                <type>pom</type>
                <scope>import</scope>
            </dependency>
        </dependencies>
</dependencyManagement>
유레카 서버 구성
Eureka 서버에는 Spring Cloud 스타터 netflix eureka 서버 종속성이 필요합니다.
<dependency>
    <groupId>org.springframework.cloud</groupId>
    <artifactId>spring-cloud-starter-netflix-eureka-server</artifactId>
</dependency>
그런 다음 다음과 같은 속성 집합이 필요합니다.
# Setting a name for out app
spring:
  application:
    name: registry-server

# Simply telling Eureka server to NOT fetch or register to any server since it's not a client.
eureka:
  client:
    register-with-eureka: false
    fetch-registry: false
마지막으로
@EnableEurekaServer 주석을 사용하여 앱을 레지스트리 서비스로 선언해야 합니다.@SpringBootApplication
@EnableEurekaServer
public class RegistryEurekaServerApplication {
public static void main(String[] args) {
SpringApplication.run(RegistryEurekaServerApplication.class, args);
}
}
Eureka에서 생성한 사용자 인터페이스를 찾을 수 있습니다. 우리의 경우는 localhost:8099
 입니다.
입니다.유레카 클라이언트 구성
Eureka 클라이언트에는 Spring Cloud 스타터 netflix eureka 클라이언트 종속성이 필요합니다.
<dependency>
    <groupId>org.springframework.cloud</groupId>
    <artifactId>spring-cloud-starter-netflix-eureka-client</artifactId>
</dependency>
또한 이 경우 속성 집합이 필요합니다.
# Setting a name for out app
spring:
  application:
    name: registry-eureka-client

eureka:
  client:
    # To register to the eureka server
    registerWithEureka: true

    # To fetch the registry from the eureka server
    fetchRegistry: true

    # The location of the eureka server
    serviceUrl:
      defaultZone: http://localhost:8099/eureka/

  instance:
    # The instance hostname
    hostname: localhost

    # The instance unique id
    instanceId: ${eureka.instance.hostname}:${spring.application.name}

    # A bench of health information end-points provided by eureka
    statusPageUrl: http://${eureka.hostname}/
    healthCheckUrl: http://${eureka.hostname}/actuator/health
    secureHealthCheckUrl: http://${eureka.hostname}/actuator/health
마지막으로
@EnableDiscoveryClient 주석을 사용하여 앱을 검색 클라이언트(Eureka 클라이언트)로 선언해야 합니다.@SpringBootApplication
@EnableDiscoveryClient
public class RegistryEurekaClientApplication {
public static void main(String[] args) {
SpringApplication.run(RegistryEurekaClientApplication.class, args);
}
}
일단 클라이언트 앱을 시작하면 실행 중인 유레카 서버에 성공적으로 등록되었음을 알 수 있습니다.

UI 대시보드에서 다음을 볼 수 있습니다.

이것은 불완전한 것처럼 보일 수 있지만 실제로는 등록된 서비스 인스턴스에 대해 유레카 서버를 가져오고 이를 악용하지 않기 때문입니다. 이것이 Netflix Zuul이라는 역 프록시를 사용하여 수행할 다음 기사의 주요 목적입니다.
더 많은 기사Here .
Reference
이 문제에 관하여(Spring Cloud: netflix eureka를 사용한 서비스 검색 소개), 우리는 이곳에서 더 많은 자료를 발견하고 링크를 클릭하여 보았다 https://dev.to/xrio/spring-cloud-introduction-to-service-discovery-using-netflix-eureka-3n7k텍스트를 자유롭게 공유하거나 복사할 수 있습니다.하지만 이 문서의 URL은 참조 URL로 남겨 두십시오.

좋은 웹페이지 즐겨찾기
