Python의 AWS CDK - Lambda 함수 예약
🗒️ 내용
1. AWS CDK 101
1.1. IaC(코드형 인프라)
개발자가 코드를 처리하는 것과 동일한 방식으로 인프라를 처리하는 것은 DevOps의 가장 기본적인 원칙 중 하나입니다.
Infrastructure as code (IaC) means provisioning, configuring and managing your infrastructure resources using code and templates.
1.2. AWS CDK
CloudFormation 템플릿은 애플리케이션 인프라를 정의하는 데 사용됩니다. 그러나 AWS CDK 덕분에 프로그래밍 언어의 모든 기능을 활용하여 인프라를 설명할 수 있습니다.
AWS CDK is a framework for defining cloud infrastructure in code and provisioning it through AWS CloudFormation.
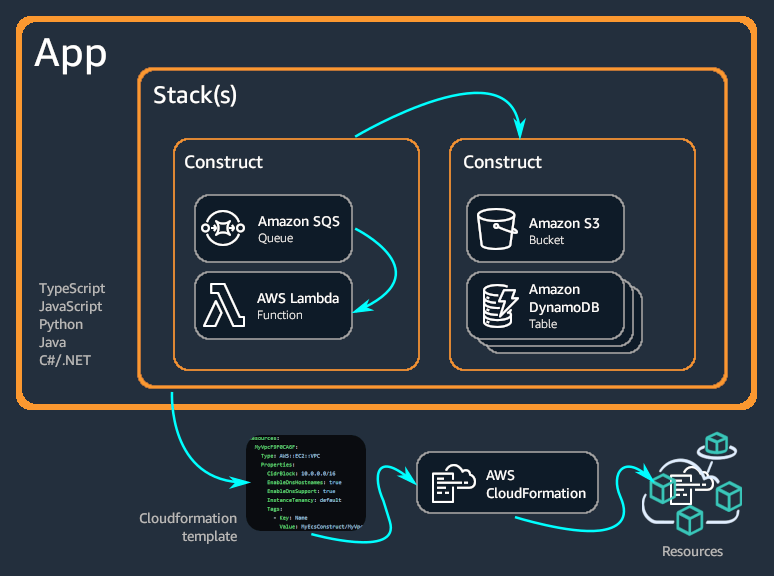
1.3. AWS CDK 기본 개념

CDK 앱 구조(출처: https://docs.aws.amazon.com/cdk/v2/guide/images/AppStacks.png )
2. CDK 설치
AWS CDK는 사용하는 프로그래밍 언어와 상관없이 Node.js를 백엔드로 사용하므로
nodejs가 필요합니다.> sudo apt install nodejs
> npm install -g aws-cdk
> cdk --version
virtualenv 패키지 설치프로그래밍 언어가
Python 인 경우 가상 환경을 사용하는 것이 좋습니다.> pip install virtualenv
또한 CDK CLI가 AWS와 통신할 수 있도록 로컬 개발 환경에서 AWS 자격 증명을 구성해야 합니다.
> aws configure
3. 실습: Python에서 AWS CDK를 사용하여 Lambda 함수 예약
이 자습서는 AWS CDK를 사용하여 일정 ⏰에 따른 AWS Lambda 함수인 첫 번째 애플리케이션을 구축하는 방법을 보여줍니다.
1단계: cdk init 명령을 사용하여 앱 초기화
> mkdir ScheduleLambda
> cd ScheduleLambda
> cdk init app --language python
...
Executing Creating virtualenv...
✅ All done!
cdk init는 비어 있지 않은 디렉토리에서 실행할 수 없습니다!2단계: 앱의 Python 가상 환경 활성화 및 종속성 설치
> source .venv/bin/activate
> python -m pip install -r requirements.txt
S3 버킷 및 IAM 역할과 같이 AWS CDK가 배포를 수행하는 데 필요한 리소스를 프로비저닝하려면 처음에만 Bootstrapping이 필요합니다.
> cdk bootstrap aws://<your_account_id>/<your_region>
3단계: 아래 내용이 포함된 파일
lambda/lambda-handler.py 추가def handler(event, context):
print("This is the Schedule Lambda Function's log")
print(event['time'])
cdk가 우리를 위해 가상 환경을 준비하는 것을 볼 수 있습니다.
우리 응용 프로그램의 구조는 다음과 같습니다.
├── app.py
├── cdk.json
├── lambda
│   └── lambda-handler.py
├── README.md
├── requirements-dev.txt
├── requirements.txt
├── schedule_lambda
│   ├── __init__.py
│   └── schedule_lambda_stack.py
├── source.bat
└── tests
4단계: 다음과 같이
schedule_lambda_stack.py의 내용을 업데이트합니다.from aws_cdk import (
Duration, Stack,
aws_lambda,
aws_events,
aws_events_targets
)
from constructs import Construct
class ScheduleLambdaStack(Stack):
def __init__(self, scope: Construct, construct_id: str, **kwargs) -> None:
super().__init__(scope, construct_id, **kwargs)
# The code that defines your stack goes here
schedule_lambda = aws_lambda.Function(self,
'ScheduleLambda',
handler='lambda-handler.handler',
runtime=aws_lambda.Runtime.PYTHON_3_9,
code=aws_lambda.Code.from_asset('lambda'),
timeout=Duration.seconds(300)
)
schedule_lambda_rule = aws_events.Rule(self,
"ScheduleLambdaRule",
schedule=aws_events.Schedule.rate(Duration.minutes(1))
)
schedule_lambda_rule.add_target(aws_events_targets.LambdaFunction(schedule_lambda))
5단계: AWS CloudFormation 템플릿 합성
> cdk synth
6단계: 스택 배포
> cdk deploy
...
Do you wish to deploy these changes (y/n)? y
...
 ✅  ScheduleLambdaStack
> cdk destroy ScheduleLambdaStack
Are you sure you want to delete: ScheduleLambdaStack (y/n)? y
...
 ✅  ScheduleLambdaStack: destroyed
Reference
이 문제에 관하여(Python의 AWS CDK - Lambda 함수 예약), 우리는 이곳에서 더 많은 자료를 발견하고 링크를 클릭하여 보았다 https://dev.to/vinhle/-develop-a-schedule-app-aws-cdk-with-python-part-1-4nbi텍스트를 자유롭게 공유하거나 복사할 수 있습니다.하지만 이 문서의 URL은 참조 URL로 남겨 두십시오.
![]() 우수한 개발자 콘텐츠 발견에 전념
(Collection and Share based on the CC Protocol.)
우수한 개발자 콘텐츠 발견에 전념
(Collection and Share based on the CC Protocol.)
좋은 웹페이지 즐겨찾기
