서명 기반 인증 + Next.js? 10분 안에 Zalter를 통합하는 방법
41319 단어 authenticationnextjspasswordless
Zalter는 현재 비공개 베타 버전이지만 일반적으로 모든 유형의 조직 및 프로젝트를 허용합니다! 통합 또는 버그 보고서와 관련하여 질문이 있는 경우 당사Discord server에서 토론에 참여하십시오.
GitHub 레포
샘플 앱 복제here
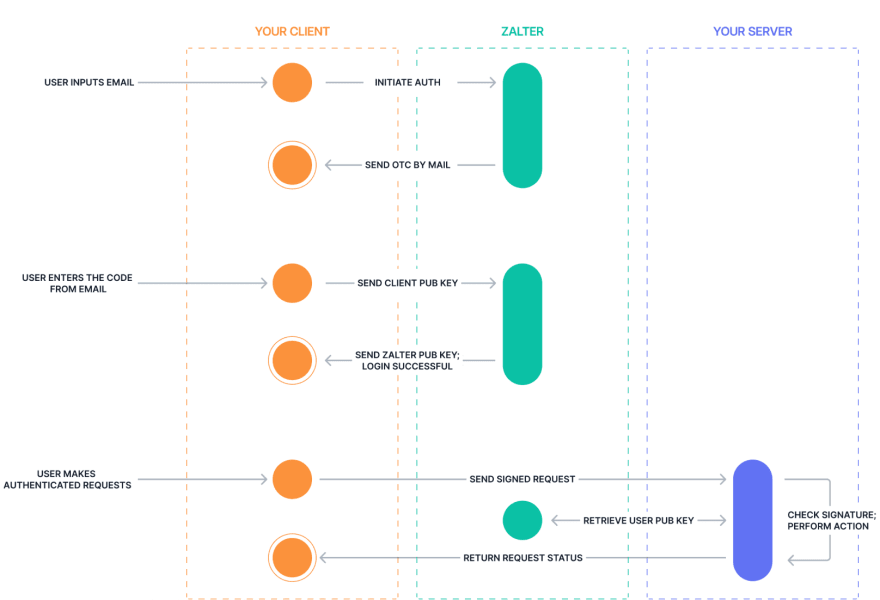
소개
이것은 사용자 인증을 추가하고 백엔드에서 서명의 기본 처리를 수행하는 방법에 대한 데모입니다. 단순한 OAuth 또는 토큰 기반 인증에서 제공하는 수준 이상으로 보안을 강화하기 위한 최상의 보안 사례에 대해 자세히 다루지 않으므로 데모 목적으로만 작성되었습니다. 여전히 최소한 OAuth2 또는 다른 인증 시스템만큼 안전하지만 그보다 더 나을 수 있음을 이해해야 합니다.
시작하기 전에
이 가이드를 최대한 활용하려면 다음이 필요합니다.
애플리케이션 설정
새 Next.js 애플리케이션을 만듭니다.
npx create-next-app demo
SDK 설치
npm install --save @zalter/identity @zalter/identity-js
고객 입장에서
인증 라이브러리 초기화
// lib/auth.js

import { Auth } from '@zalter/identity-js';

export const auth = new Auth({
  projectId: '<your-project-id>'
});
로그인 페이지 만들기
이 페이지에는 두 가지 양식이 있습니다. 하나는 이메일 주소용이고 다른 하나는 인증을 완료하기 위해 수신될 코드용입니다.
// pages/sign-in.js

import { useState } from 'react';
import Router from 'next/router';
import { auth } from '../lib/auth';

export default function SignIn() {
  const [email, setEmail] = useState('');
  const [emailSent, setEmailSent] = useState(false);
  const [code, setCode] = useState('');
  const [error, setError] = useState('');

  const onEmailSubmit = async (event) => {
    event.preventDefault();

    try {
      await auth.signInWithCode('start', {
        email
      });
      setEmailSent(true);
    } catch (err) {
      console.error(err);
      setError(err.message || 'Something went wrong');
    }
  };

  const onCodeSubmit = async (event) => {
    event.preventDefault();

    try {
      await auth.signInWithCode('finalize', {
        code
      });

      // Now you can redirect the user to a private page
      Router.push('/dashboard').catch(console.error);
    } catch (err) {
      console.error(err);
      setError(err.message || 'Something went wrong');
      // Zalter Identity service allows only one try per code.
      // The user has to request another code.
      // This allows Zalter to prevent man-in-the-middle attacks.
      setCode('');
      setEmailSent(false);
    }
  };

  return (
    <div>
      {!emailSent ? (
        <form onSubmit={onEmailSubmit}>
          <h3>Enter your email</h3>
          <div>
            <input
              name="email"
              onChange={(event) => setEmail(event.target.value)}
              placeholder="Email address"
              type="email"
              value={email}
            />
          </div>
          {error && (
            <div>
              {error}
            </div>
          )}
          <button type="submit">
            Continue
          </button>
        </form>
      ) : (
        <form onSubmit={onCodeSubmit}>
          <h3>Enter your code</h3>
          <div>
            <input
              name="code"
              onChange={(event) => setCode(event.target.value)}
              placeholder="Code"
              type="text"
              value={code}
            />
          </div>
          <button type="submit">
            Continue
          </button>
        </form>
      )}
    </div>
  );
}
라우팅
auth.isAuthenticated() 기능을 사용하여 페이지 새로고침 시 사용자가 인증되었는지 여부를 확인하고 사용자를 한 페이지 또는 다른 페이지로 라우팅할 수 있습니다.if (await auth.isAuthenticated()) {
// show the user back-office pages
} else {
// show the login page.
}
로그아웃
// pages/dashboard.js

import Router from 'next/router';
import { auth } from '../lib/auth';

export default function Dashboard() {
  const onSignOut = async () => {
    try {
      await auth.signOut();

      // Redirect user to a public page
      Router.push('/').catch(console.error);
    } catch (err) {
      console.error(err);
    }
  };

  return (
     <div>
      <h1>Dashboard</h1>
      <button onClick={onSignOut}>
        Sign out
      </button>
     </div>
  );
}
현재 인증된 사용자 검색
메시지에 서명하기 위해 필요한 유틸리티 기능을 노출하는 현재 인증된 사용자를 얻을 수 있습니다.
const user = await auth.getCurrentUser();
요청 서명/승인
이제 사용자가 성공적으로 인증되었으므로 사용자가 수행하기 위해 인증을 받아야 하는 모든 요청에 서명할 수 있습니다.
/*
 * Signing helper function that accepts a requestInit, similar to fetch.
 * @param {RequestInit} request
 * @return {Promise<RequestInit>}
 */
async function signRequest(request) {
  const { method, headers, body } = request;

  // Load current user
  const user = await auth.getCurrentUser();

  // Get signing key ID
  const keyId = user.subSigKeyId;

  // Convert the body from String to Uint8Array
  const dataToSign = new TextEncoder().encode(body);

  // Sign the data using the user credentials
  const sig = await user.signMessage(dataToSign);

  // Convert the sig from Uint8Array to Base64
  // You might need an external package to handle Base64 encode/decode
  // https://www.npmjs.com/package/buffer
  const encodedSig = Buffer.from(sig).toString('base64');

  return {
    method,
    headers: {
      ...headers,
      'x-signature': `${keyId};${encodedSig}`
    },
    body
  };
}

// Lets say that we want to make a POST request to an API

const request = await signRequest({
  method: 'POST',
  headers: {
    'Content-Type': 'application/json'
  },
  body: JSON.stringify({
    name: 'John',
    email: '[email protected]'
  })
});

const response = await fetch('/api/orders', request);
This example only signs the body, but it can be adapted to sign other data, such as current timestamp, expire date, request headers, etc.
서버 측
ID 클라이언트 초기화
SDK를 서버 측에서 사용할 수 있으려면 서비스 계정 자격 증명을 사용하여 초기화해야 합니다.
// lib/identity.js

import { IdentityClient } from '@zalter/identity';

const config = {
  projectId: '<your-project-id>',
  credentials: '<your-credentials>'
};

export const identityClient = new IdentityClient(config);
사용자 공개 키 검색
클라이언트가 시작되면 서버에 요청을 하는 사용자의 공개 키를 쉽게 검색하고 키가 있으면 서명을 확인할 수 있습니다.
공개 키는 여러 가지 이유로 무효화될 수 있으며 더 이상 유효하지 않은 키를 처리하는 상황(예: 사용자가 모든 세션에서 로그아웃됨).
const keyId = ''; // retrieve key ID from 'x-signature' header

const keyRecord = await identityClient.getPublicKey(keyId);
바디 파서 미들웨어 생성
현재 Next.js는 요청의 원시 데이터를 노출하지 않습니다. 요청을 자동으로 처리하고 요청 콘텐츠 유형 헤더를 기반으로 본문을 구문 분석합니다. 그래서 우리가 직접 처리해야 합니다.
// lib/middlewares/body-parser-middleware.js

import bodyParser from 'body-parser';

export const bodyParserMiddleware = bodyParser.json({
  verify: (req, res, buf) => {
    req.rawBody = buf
  }
});
인증 미들웨어 생성
이 미들웨어는 클라이언트 측에서 보낸
x-signature 헤더의 값을 검색합니다.keyId를 추출하여 Zalter Identity 서비스에서 공개 키를 가져오고 확인을 위해 sig를 추출합니다.요청.
// lib/middlewares/auth-middleware.js

import { Verifier } from '@zalter/identity';
import { identityClient } from './identity';

export async function authMiddleware(req, res, next) {
  const signatureHeader = req.headers['x-signature'];

  if (!signatureHeader) {
    console.log('Missing signature header');
    res.status(401).json({ message: 'Not authorized' });
    return;
  }

  // Get the key ID and sig
  const [keyId, sig] = signatureHeader.split(';');

  if (!keyId || !sig) {
    console.log('Invalid signature header format');
    res.status(401).json({ message: 'Not authorized' });
    return;
  }

  // Decode sig to get the signature bytes
  const rawSig = new Uint8Array(Buffer.from(sig, 'base64'));

  // Fetch the user public key from Zalter Identity service
  let keyRecord;

  try {
    keyRecord = await identityClient.getPublicKey(keyId);
  } catch (err) {
    console.error(err);

    if (err.statusCode === 404) {
      console.log('Public key not found');
      res.status(401).json({ message: 'Not authorized' });
      return;
    }

    res.status(500).json({ message: 'Internal Server Error' });
    return;
  }

  // Get the raw body of the message
  // Remember to add your own bodyParser since Next.js server does not expose the raw body
  const { rawBody } = req;

  // Construct data to verify (must be the same value as the data signed on the browser side)
  const dataToVerify = rawBody ? new Uint8Array(rawBody) : new Uint8Array(0);

  // Verify the signature
  const isValid = Verifier.verify(
    keyRecord.key,
    keyRecord.alg,
    rawSig,
    dataToVerify
  );

  if (!isValid) {
    console.log('Invalid signature');
    res.status(401).json({ message: 'Not authorized' });
    return;
  }

  // Persist user ID for other use
  // We can use any storage strategy. Here we simulate the "res.locals" from Express.
  res.locals = res.locals || {};
  res.locals.userId = keyRecord.subId;

  // Continue to the next middleware / handler
  next();
}
미들웨어 도우미 만들기
이 도우미를 사용하면 모든 API 처리기에서 미들웨어를 실행할 수 있습니다.
// lib/run-middleware.js

export function runMiddleware(req, res, fn) {
  return new Promise((resolve, reject) => {
    fn(req, res, (result) => {
      if (result instanceof Error) {
        return reject(result);
      }

      return resolve(result);
    });
  });
}
API 경로 만들기
이제 인증 미들웨어가 있으므로 모든 경로를 보호할 수 있습니다. Next.js가 솔루션을 제공할 때까지 기본 본문 파서를 비활성화하고 자체 구현을 사용해야 합니다.
// pages/api/orders.js

import { authMiddleware } from '../../lib/middlewares/auth-middleware';
import { bodyParserMiddleware } from '../../lib/middlewares/body-parser-middleware';
import { runMiddleware } from '../../lib/run-middleware';

// Disable default body parser middleware
export const config = {
  api: {
    bodyParser: false
  }
};

export default async function(req, res) {
  await runMiddleware(req, res, bodyParserMiddleware);
  await runMiddleware(req, res, authMiddleware);

  // To retrieve the user ID set in auth middleware you can use
  // res.locals.userId

  // Now you can retrieve the user data from your database.

  res.status(200).json({
    message: 'It works!'
  });
}
최종 참고 사항
이 기사가 통합을 조금 덜 무섭게 만들고 사용자 인증에 대한 새로운 접근 방식에 대해 흥미를 가질 수 있기를 바랍니다. 우리는 개발자의 피드백에 따라 지속적으로 API와 제품을 업데이트하고 있습니다. 여러분의 의견을 듣고 싶습니다. Discord 또는 email로 연락하십시오.
Reference
이 문제에 관하여(서명 기반 인증 + Next.js? 10분 안에 Zalter를 통합하는 방법), 우리는 이곳에서 더 많은 자료를 발견하고 링크를 클릭하여 보았다 https://dev.to/adrianmanea/signature-based-auth-nextjs-how-to-integrate-zalter-under-10-minutes-3k82텍스트를 자유롭게 공유하거나 복사할 수 있습니다.하지만 이 문서의 URL은 참조 URL로 남겨 두십시오.
![]() 우수한 개발자 콘텐츠 발견에 전념
(Collection and Share based on the CC Protocol.)
우수한 개발자 콘텐츠 발견에 전념
(Collection and Share based on the CC Protocol.)
좋은 웹페이지 즐겨찾기
