플래터로 메뉴 프로그램 만들기🍳
만약 당신이 동영상을 통해 공부하는 것을 좋아한다면 watch the video
📕 이 시리즈의 내용은 다음과 같습니다.
선결 조건:
소스 코드:
인디애나 푸구이 / 메뉴
배합 응용 프로그램과 떨림
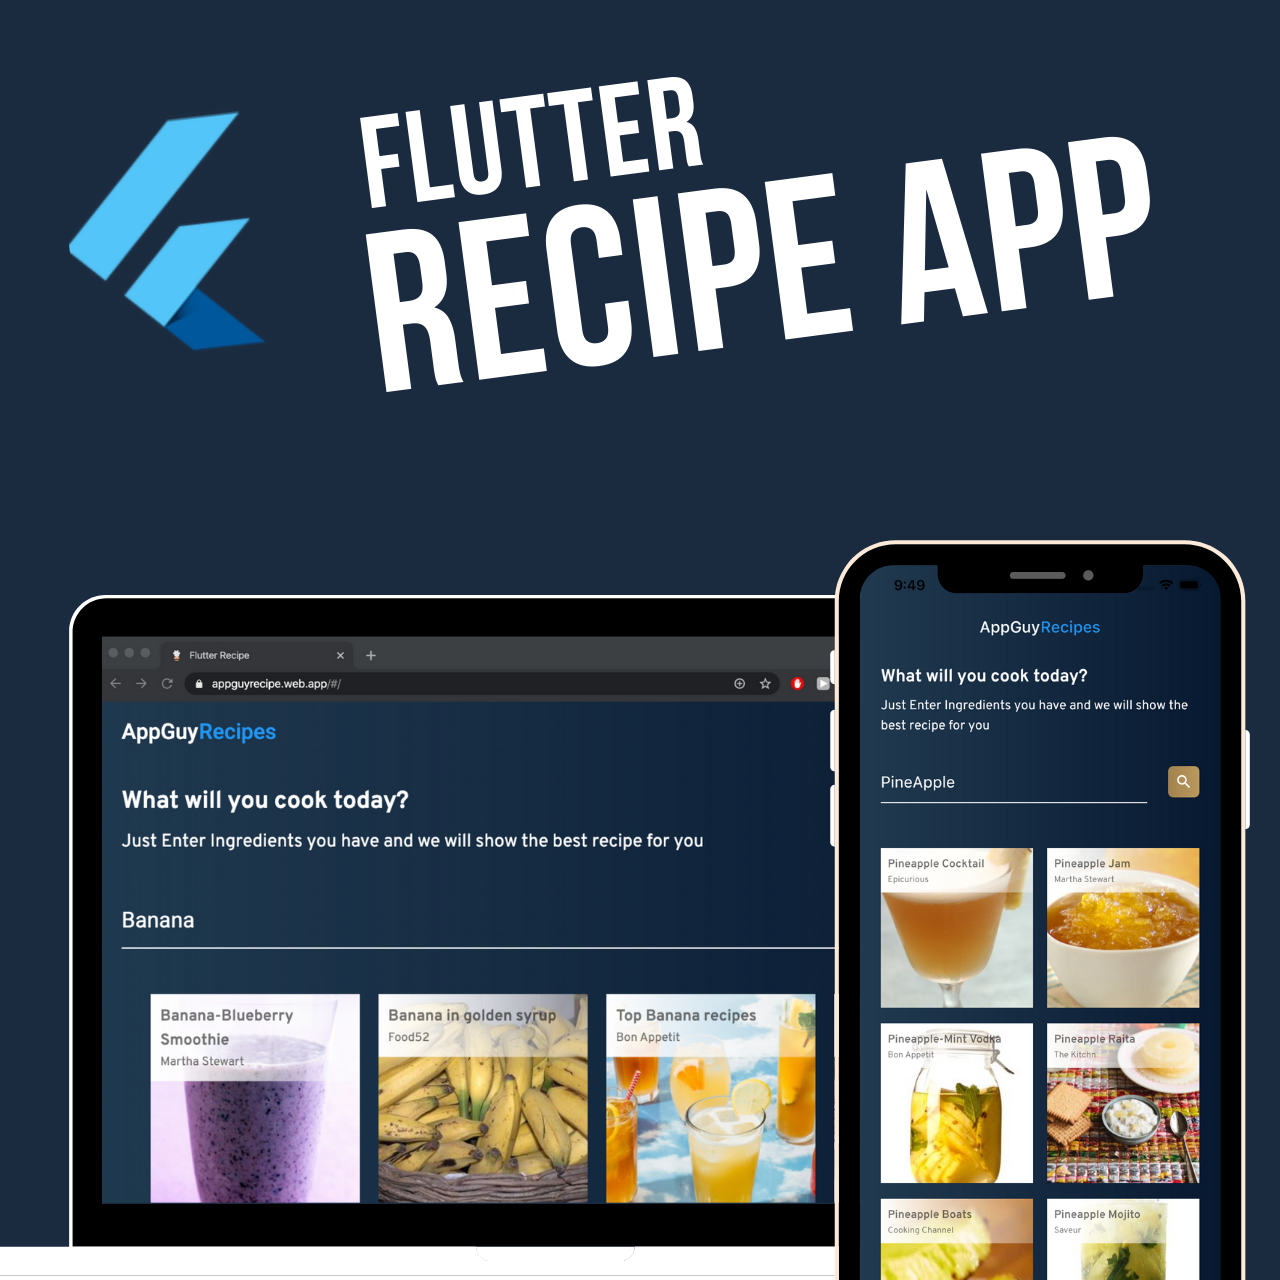
플래터로 메뉴 프로그램 만들기
모든 무료 수업: https://youtu.be/VTR5HpRfS0A
오늘 방송에서 우리는 #flatter의 기초 지식을 배우고 실제 세계의 응용 프로그램을 만들 것이다.우리는 플래터만 사용하여 식품 레시피 응용 프로그램을 구축하는 방법을 배울 것이다.
📕 이 비디오에 포함된 내용:
• 떨림을 통해api에서 데이터 얻기
• 떨림 중 어떻게 사용하는지
• 작은 부품에 떨림 데이터를 전달하는 방법
• 메쉬 뷰를 표시하는 방법
만약 당신이 Flatter의 초보자라면, 나는 당신이 따라하는 것을 강력히 권장합니다. 왜냐하면 당신은 모든 작은 부분을 함께 놓아서api에서 데이터를 얻는 방법, 상태를 업데이트하는 방법 등을 이해할 수 있기 때문입니다.
View on GitHub
인코딩을 시작합시다.
첫 번째 단계: 떨림 프로젝트를 만듭니다.
나는 안드로이드 스튜디오로 이 일을 할 것이다. 너는terminal/cmd 또는 VS 코드를 사용할 수 있다. 차이가 없다.
2단계: 코드 정리
우리는 모든 주요 평론을 삭제하는 것부터 시작할 것이다.dart 및 MyHomePage() 상태 제거 위젯
3단계: 필요한 패키지 설치
http//api를 사용합니다.
웹view flatter//모바일 응용 프로그램에서 웹뷰를 사용할 수 있습니다.
url launcher//웹 사이트에서 새 탭에서 레시피 URL을 열 수 있습니다.
설치하려면pubspec에 추가하십시오.cupertino 아이콘 아래에 있는 yaml 파일을 보고 vs 코드 Ctrl+S (저장) 에 대해 안드로이드 스튜디오에서 오른쪽 상단에 있는 Packages get을 누르십시오.
4단계: 집을 만든다.던지다
내부 보기 폴더를 홈 뷰에 추가합니다.이렇게 다트.
import 'package:flutter/material.dart';
import 'package:recipe_app/views/home.dart';

void main() {
  runApp(MyApp());
}

class MyApp extends StatelessWidget {
  // This widget is the root of your application.
  @override
  Widget build(BuildContext context) {
    return MaterialApp(
      title: 'Flutter Recipe',
      debugShowCheckedModeBanner: false,
      home: Home(),
    );
  }
}
5단계: 응용 프로그램에 사용자 인터페이스를 만듭니다.
초보자로서 모든 작은 위젯을 이해해야 한다. (모든 것이 flutter 이미지, 텍스트, 용기의 작은 위젯이다.)Flatter 공식 위젯 디렉터리 보기: https://flutter.dev/docs/development/ui/widgets
가장 중요한 점에 대해 논의해 보겠습니다. 더 잘 이해할 수 있도록 영상을 보시기 바랍니다.
비계는 무엇입니까?
이것은 패키지로서 미리 구축된 작은 위젯을 제공합니다. 예를 들어 appbar, 부동 조작 단추, 서랍 등입니다. 그래서 우리는 처음부터 그것을 만들 필요가 없습니다.
스택이란?
우리는 Stack을 사용하여 작은 위젯을 다른 위젯 위에 놓고 샌드위치로 간주하지만,brads가 없는 작은 위젯이 있습니다. 이것은 그림 위의 텍스트일 수도 있고, 사용자 정의 그림/배경 위의 완전한 응용 프로그램일 수도 있습니다.
무엇이 칼럼입니까?
열은 작은 위젯을 수직으로 하나씩 배열하는 데 사용됩니다.
줄이란 무엇인가?
줄은 작은 위젯을 수평으로 배열하는 데 사용됩니다.
Sizedbox란?
Sizedbox는 그림과 텍스트 사이의 공간일 수도 있고 텍스트와 텍스트 사이의 공간일 수도 있으며, 보통 작은 위젯일 수도 있습니다.
그라데이션 배경은 어떻게 사용합니까?
그래디언트에 대해 용기가 선형 그래디언트 특성을 가지고 있다면 우리는 상자 장식 특성을 사용한다.
또한 사용자가 필드에 입력한 내용을 추적하기 위해 Textedit 컨트롤러를 사용합니다.나는 또한 맞춤형 글씨체 육교를 사용했기 때문에 다음 단계에도 그것을 추가할 것이다.
이것들은 모두 우리가 집에서 지은 물건의 총결이다.성도 줄.(내가 뭘 놓쳤나? 댓글로 말해줘)
import 'dart:convert';
import 'dart:io';
import 'package:flutter/foundation.dart';
import 'package:flutter/material.dart';
import 'package:http/http.dart' as http;
import 'package:recipe_app/models/recipe_model.dart';
import 'package:recipe_app/views/recipe_view.dart';
import 'package:url_launcher/url_launcher.dart';
class Home extends StatefulWidget {
@override
_HomeState createState() => _HomeState();
}
class _HomeState extends State<Home> {
List<RecipeModel> recipies = new List();
String ingridients;
bool _loading = false;
String query = "";
TextEditingController textEditingController = new TextEditingController();
@override
void initState() {
super.initState();
}
@override
Widget build(BuildContext context) {
return Scaffold(
body: Stack(
children: <Widget>[
Container(
height: MediaQuery.of(context).size.height,
width: MediaQuery.of(context).size.width,
decoration: BoxDecoration(
gradient: LinearGradient(
colors: [
const Color(0xff213A50),
const Color(0xff071930)
],
begin: FractionalOffset.topRight,
end: FractionalOffset.bottomLeft)),
),
SingleChildScrollView(
child: Container(
padding: EdgeInsets.symmetric(vertical: !kIsWeb ? Platform.isIOS? 60: 30 : 30, horizontal: 24),
child: Column(
crossAxisAlignment: CrossAxisAlignment.start,
children: <Widget>[
Row(
mainAxisAlignment: kIsWeb
? MainAxisAlignment.start
: MainAxisAlignment.center,
children: <Widget>[
Text(
"AppGuy",
style: TextStyle(
fontSize: 18,
color: Colors.white,
fontFamily: 'Overpass'),
),
Text(
"Recipes",
style: TextStyle(
fontSize: 18,
color: Colors.blue,
fontFamily: 'Overpass'),
)
],
),
SizedBox(
height: 60,
),
Text(
"What will you cook today?",
style: TextStyle(
fontSize: 20,
color: Colors.white,
fontWeight: FontWeight.w400,
fontFamily: 'Overpass'),
),
Text(
"Just Enter Ingredients you have and we will show the best recipe for you",
style: TextStyle(
fontSize: 15,
color: Colors.white,
fontWeight: FontWeight.w300,
fontFamily: 'OverpassRegular'),
),
SizedBox(
height: 40,
),
Container(
child: Row(
children: <Widget>[
Expanded(
child: TextField(
controller: textEditingController,
style: TextStyle(
fontSize: 16,
color: Colors.white,
fontFamily: 'Overpass'),
decoration: InputDecoration(
hintText: "Enter Ingridients",
hintStyle: TextStyle(
fontSize: 16,
color: Colors.white.withOpacity(0.5),
fontFamily: 'Overpass'),
enabledBorder: UnderlineInputBorder(
borderSide: BorderSide(color: Colors.white),
),
focusedBorder: UnderlineInputBorder(
borderSide: BorderSide(color: Colors.white),
),
),
),
),
SizedBox(
width: 16,
),
InkWell(
onTap: () async {
if (textEditingController.text.isNotEmpty) {
setState(() {
_loading = true;
});
recipies = new List();
String url =
"https://api.edamam.com/search?q=${textEditingController.text}&app_id=0f21d949&app_key=8bcdd93683d********5cb95e64ab26";
var response = await http.get(url);
print(" $response this is response");
Map<String, dynamic> jsonData =
jsonDecode(response.body);
print("this is json Data $jsonData");
jsonData["hits"].forEach((element) {
print(element.toString());
RecipeModel recipeModel = new RecipeModel();
recipeModel =
RecipeModel.fromMap(element['recipe']);
recipies.add(recipeModel);
print(recipeModel.url);
});
setState(() {
_loading = false;
});
print("doing it");
} else {
print("not doing it");
}
},
child: Container(
decoration: BoxDecoration(
borderRadius: BorderRadius.circular(8),
gradient: LinearGradient(
colors: [
const Color(0xffA2834D),
const Color(0xffBC9A5F)
],
begin: FractionalOffset.topRight,
end: FractionalOffset.bottomLeft)),
padding: EdgeInsets.all(8),
child: Row(
mainAxisSize: MainAxisSize.min,
children: <Widget>[
Icon(
Icons.search,
size: 18,
color: Colors.white
),
],
),
)),
],
),
),
SizedBox(
height: 30,
),
Container(
child: GridView(
gridDelegate: SliverGridDelegateWithMaxCrossAxisExtent(
mainAxisSpacing: 10.0, maxCrossAxisExtent: 200.0),
shrinkWrap: true,
scrollDirection: Axis.vertical,
physics: ClampingScrollPhysics(),
children: List.generate(recipies.length, (index) {
return GridTile(
child: RecipieTile(
title: recipies[index].label,
imgUrl: recipies[index].image,
desc: recipies[index].source,
url: recipies[index].url,
));
})),
),
],
),
),
)
],
),
);
}
}
class RecipieTile extends StatefulWidget {
final String title, desc, imgUrl, url;
RecipieTile({this.title, this.desc, this.imgUrl, this.url});
@override
_RecipieTileState createState() => _RecipieTileState();
}
class _RecipieTileState extends State<RecipieTile> {
_launchURL(String url) async {
print(url);
if (await canLaunch(url)) {
await launch(url);
} else {
throw 'Could not launch $url';
}
}
@override
Widget build(BuildContext context) {
return Wrap(
children: <Widget>[
GestureDetector(
onTap: () {
if (kIsWeb) {
_launchURL(widget.url);
} else {
print(widget.url + " this is what we are going to see");
Navigator.push(
context,
MaterialPageRoute(
builder: (context) => RecipeView(
postUrl: widget.url,
)));
}
},
child: Container(
margin: EdgeInsets.all(8),
child: Stack(
children: <Widget>[
Image.network(
widget.imgUrl,
height: 200,
width: 200,
fit: BoxFit.cover,
),
Container(
width: 200,
alignment: Alignment.bottomLeft,
decoration: BoxDecoration(
gradient: LinearGradient(
colors: [Colors.white30, Colors.white],
begin: FractionalOffset.centerRight,
end: FractionalOffset.centerLeft)),
child: Padding(
padding: const EdgeInsets.all(8.0),
child: Column(
crossAxisAlignment: CrossAxisAlignment.start,
children: <Widget>[
Text(
widget.title,
style: TextStyle(
fontSize: 13,
color: Colors.black54,
fontFamily: 'Overpass'),
),
Text(
widget.desc,
style: TextStyle(
fontSize: 10,
color: Colors.black54,
fontFamily: 'OverpassRegular'),
)
],
),
),
)
],
),
),
),
],
);
}
}
class GradientCard extends StatelessWidget {
final Color topColor;
final Color bottomColor;
final String topColorCode;
final String bottomColorCode;
GradientCard(
{this.topColor,
this.bottomColor,
this.topColorCode,
this.bottomColorCode});
@override
Widget build(BuildContext context) {
return Padding(
padding: const EdgeInsets.all(8.0),
child: Wrap(
children: <Widget>[
Container(
child: Stack(
children: <Widget>[
Container(
height: 160,
width: 180,
decoration: BoxDecoration(
gradient: LinearGradient(
colors: [topColor, bottomColor],
begin: FractionalOffset.topLeft,
end: FractionalOffset.bottomRight)),
),
Container(
width: 180,
alignment: Alignment.bottomLeft,
decoration: BoxDecoration(
gradient: LinearGradient(
colors: [Colors.white30, Colors.white],
begin: FractionalOffset.centerRight,
end: FractionalOffset.centerLeft)),
child: Padding(
padding: const EdgeInsets.all(8.0),
child: Column(
children: <Widget>[
Text(
topColorCode,
style: TextStyle(fontSize: 16, color: Colors.black54),
),
Text(
bottomColorCode,
style: TextStyle(fontSize: 16, color: bottomColor),
)
],
),
),
)
],
),
),
],
),
);
}
}
6단계: 바이브레이션 응용 프로그램에 사용자 정의 글꼴 추가하기
먼저 글꼴을 다운로드합니다.my github repo:otf 파일에서 온 다음assets/fonts 폴더에 추가
그리고pubspec에서 그것들을 언급했다.이런yaml 파일입니다.완전한pubspec를 검사합니다.여기는yaml 파일입니다.
 fonts:
    - family: Overpass
      fonts:
       - asset: assets/fonts/overpass_bold.otf
    - family: OverpassRegular
      fonts:
        - asset: assets/fonts/overpass_regular.otf
단계 7: 떨림 응용 프로그램에서 Api 사용
이제 Edamam Api를 추가하여 레시피 데이터베이스를 사용하고 out 응용 프로그램에 요청을 표시합니다
최초 등록: https://developer.edamam.com/edamam-recipe-api
대시보드 > 애플리케이션 > 보기 > 애플리케이션 키 복사 를 클릭합니다.
8단계:api를 호출하여 응용 프로그램에서 검색 데이터를 얻습니다. 따라서 응용 프로그램 사용자가 내용을 제출하고 검색을 눌렀을 때 이 onTap을 실행합니다.
코드가 맨 위 홈 페이지에 추가되었습니다.성도 파일입니다. 그래서 지금 실행하려면 작동할 것입니다.Api 키가 업데이트되었는지 확인만 하면 됩니다.
9단계: 응용 프로그램에 웹 뷰를 추가합니다.
웹 보기를 표시하는 것은 매우 간단합니다. 추가 코드는 응용 프로그램 표시줄일 뿐입니다. 웹뷰에서 https 사이트만 볼 수 있다는 문제에 부딪혔습니다. 그래서 저는 사용자 정의 함수를 만들어서 http 사이트를https로 다시 지정했습니다.다음은 보기에서 새 파일을 만드는 코드입니다.던지다
import 'dart:async';
import 'dart:io';

import 'package:flutter/foundation.dart';
import 'package:flutter/material.dart';
import 'package:webview_flutter/webview_flutter.dart';

class RecipeView extends StatefulWidget {
  final String postUrl;
  RecipeView({@required this.postUrl});

  @override
  _RecipeViewState createState() => _RecipeViewState();
}

class _RecipeViewState extends State<RecipeView> {

  final Completer<WebViewController> _controller =
      Completer<WebViewController>();

  String finalUrl ;

  @override
  void initState() {
    // TODO: implement initState
    super.initState();
    finalUrl = widget.postUrl;
    if(widget.postUrl.contains('http://')){
      finalUrl = widget.postUrl.replaceAll("http://","https://");
      print(finalUrl + "this is final url");
    }

  }

  @override
  Widget build(BuildContext context) {
    return Scaffold(
      body: Container(
        child: Column(
          children: <Widget>[
            Container(
              padding: EdgeInsets.only(top: Platform.isIOS? 60: 30, right: 24,left: 24,bottom: 16),
              width: MediaQuery.of(context).size.width,
              decoration: BoxDecoration(
                  gradient: LinearGradient(
                      colors: [
                        const Color(0xff213A50),
                        const Color(0xff071930)
                      ],
                      begin: FractionalOffset.topRight,
                      end: FractionalOffset.bottomLeft)),
              child:  Row(
                mainAxisAlignment: kIsWeb
                    ? MainAxisAlignment.start
                    : MainAxisAlignment.center,
                children: <Widget>[
                  Text(
                    "AppGuy",
                    style: TextStyle(
                        fontSize: 18,
                        color: Colors.white,
                        fontFamily: 'Overpass'),
                  ),
                  Text(
                    "Recipes",
                    style: TextStyle(
                        fontSize: 18,
                        color: Colors.blue,
                        fontFamily: 'Overpass'),
                  )
                ],
              ),
            ),
            Container(
              height: MediaQuery.of(context).size.height - (Platform.isIOS ? 104 : 30),
              width: MediaQuery.of(context).size.width,
              child: WebView(
                onPageFinished: (val){
                  print(val);
                },
                javascriptMode: JavascriptMode.unrestricted,
                initialUrl: finalUrl,
                onWebViewCreated: (WebViewController webViewController){
                  setState(() {
                    _controller.complete(webViewController);
                  });
                },
              ),
            ),
          ],
        ),
      )
    );
  }
Rawu 응용 프로그램을 봅니다.dart❤ GitHub
프로그램을 실행하고 정상적으로 작동하는지 테스트합니까?구글😅 (나에게 효과가 있다)......ohhh는 여전히 해결되지 않았습니다. Flatternerd 커뮤니티에서 도와주고 싶은 모든 사람들을 댓글로 남겨주세요.
10단계: 인터넷에서 떨림 프로그램을 실행한다.
우선 베타 채널에 들어가서 Flatter 웹 응용 프로그램을 한 걸음 한 걸음 실행할 수 있는지 확인하세요<
그런 다음 응용 프로그램을 실행하고 chrome voila를 선택합니다.🥳 간단합니다. 설치할 필요가 없습니다.
만약 당신이 문제에 부딪혔다면, 나는 당신이 동영상에 관심을 가지는 것을 강력히 건의합니다. 이것은 더욱 좋을 것입니다. 나는 시각적으로 한 걸음 한 걸음 설명해 보려고 합니다.
🎓 네가 좋아할 수 있는 튜토리얼이 더 많아.
1. Firebase를 사용하여 완전한 떨림 채팅 응용 프로그램 구축
이 강좌에서는 Insta DM 등 일대일 실시간 채팅 검색 사용자를 이용하여 기능이 완비된 채팅 앱을 구축하는 법을 배울 것입니다.
👉 https://flutternerd.com/build-a-fully-functioning-flutter-chat-app-with-firebase-part-1-4/
2. Flatter를 사용하여 배경 그림 응용 프로그램 만들기
여기서 당신은 어떻게 벽지 응용 프로그램과 떨림을 구축하는지 배울 것입니다. 이것은 위대한 프로젝트로 투자 조합을 증가시킬 것입니다
https://flutternerd.com/build-a-wallpaper-app-with-flutter/
3. NewsApi Org을 사용하여 Flatter 뉴스 애플리케이션 구축
이 프로젝트에서는 NewsAPI를 사용합니다.그것으로 뉴스 프로그램을 구성하고 구축하다
https://flutternerd.com/news-app-with-newsapi-org-flutter/
Reference
이 문제에 관하여(플래터로 메뉴 프로그램 만들기🍳), 우리는 이곳에서 더 많은 자료를 발견하고 링크를 클릭하여 보았다
https://dev.to/theindianappguy/build-a-recipe-app-with-flutter-4iko
텍스트를 자유롭게 공유하거나 복사할 수 있습니다.하지만 이 문서의 URL은 참조 URL로 남겨 두십시오.
 우수한 개발자 콘텐츠 발견에 전념
(Collection and Share based on the CC Protocol.)
우수한 개발자 콘텐츠 발견에 전념
(Collection and Share based on the CC Protocol.)
import 'package:flutter/material.dart';
import 'package:recipe_app/views/home.dart';
void main() {
runApp(MyApp());
}
class MyApp extends StatelessWidget {
// This widget is the root of your application.
@override
Widget build(BuildContext context) {
return MaterialApp(
title: 'Flutter Recipe',
debugShowCheckedModeBanner: false,
home: Home(),
);
}
}
import 'dart:convert';
import 'dart:io';
import 'package:flutter/foundation.dart';
import 'package:flutter/material.dart';
import 'package:http/http.dart' as http;
import 'package:recipe_app/models/recipe_model.dart';
import 'package:recipe_app/views/recipe_view.dart';
import 'package:url_launcher/url_launcher.dart';
class Home extends StatefulWidget {
@override
_HomeState createState() => _HomeState();
}
class _HomeState extends State<Home> {
List<RecipeModel> recipies = new List();
String ingridients;
bool _loading = false;
String query = "";
TextEditingController textEditingController = new TextEditingController();
@override
void initState() {
super.initState();
}
@override
Widget build(BuildContext context) {
return Scaffold(
body: Stack(
children: <Widget>[
Container(
height: MediaQuery.of(context).size.height,
width: MediaQuery.of(context).size.width,
decoration: BoxDecoration(
gradient: LinearGradient(
colors: [
const Color(0xff213A50),
const Color(0xff071930)
],
begin: FractionalOffset.topRight,
end: FractionalOffset.bottomLeft)),
),
SingleChildScrollView(
child: Container(
padding: EdgeInsets.symmetric(vertical: !kIsWeb ? Platform.isIOS? 60: 30 : 30, horizontal: 24),
child: Column(
crossAxisAlignment: CrossAxisAlignment.start,
children: <Widget>[
Row(
mainAxisAlignment: kIsWeb
? MainAxisAlignment.start
: MainAxisAlignment.center,
children: <Widget>[
Text(
"AppGuy",
style: TextStyle(
fontSize: 18,
color: Colors.white,
fontFamily: 'Overpass'),
),
Text(
"Recipes",
style: TextStyle(
fontSize: 18,
color: Colors.blue,
fontFamily: 'Overpass'),
)
],
),
SizedBox(
height: 60,
),
Text(
"What will you cook today?",
style: TextStyle(
fontSize: 20,
color: Colors.white,
fontWeight: FontWeight.w400,
fontFamily: 'Overpass'),
),
Text(
"Just Enter Ingredients you have and we will show the best recipe for you",
style: TextStyle(
fontSize: 15,
color: Colors.white,
fontWeight: FontWeight.w300,
fontFamily: 'OverpassRegular'),
),
SizedBox(
height: 40,
),
Container(
child: Row(
children: <Widget>[
Expanded(
child: TextField(
controller: textEditingController,
style: TextStyle(
fontSize: 16,
color: Colors.white,
fontFamily: 'Overpass'),
decoration: InputDecoration(
hintText: "Enter Ingridients",
hintStyle: TextStyle(
fontSize: 16,
color: Colors.white.withOpacity(0.5),
fontFamily: 'Overpass'),
enabledBorder: UnderlineInputBorder(
borderSide: BorderSide(color: Colors.white),
),
focusedBorder: UnderlineInputBorder(
borderSide: BorderSide(color: Colors.white),
),
),
),
),
SizedBox(
width: 16,
),
InkWell(
onTap: () async {
if (textEditingController.text.isNotEmpty) {
setState(() {
_loading = true;
});
recipies = new List();
String url =
"https://api.edamam.com/search?q=${textEditingController.text}&app_id=0f21d949&app_key=8bcdd93683d********5cb95e64ab26";
var response = await http.get(url);
print(" $response this is response");
Map<String, dynamic> jsonData =
jsonDecode(response.body);
print("this is json Data $jsonData");
jsonData["hits"].forEach((element) {
print(element.toString());
RecipeModel recipeModel = new RecipeModel();
recipeModel =
RecipeModel.fromMap(element['recipe']);
recipies.add(recipeModel);
print(recipeModel.url);
});
setState(() {
_loading = false;
});
print("doing it");
} else {
print("not doing it");
}
},
child: Container(
decoration: BoxDecoration(
borderRadius: BorderRadius.circular(8),
gradient: LinearGradient(
colors: [
const Color(0xffA2834D),
const Color(0xffBC9A5F)
],
begin: FractionalOffset.topRight,
end: FractionalOffset.bottomLeft)),
padding: EdgeInsets.all(8),
child: Row(
mainAxisSize: MainAxisSize.min,
children: <Widget>[
Icon(
Icons.search,
size: 18,
color: Colors.white
),
],
),
)),
],
),
),
SizedBox(
height: 30,
),
Container(
child: GridView(
gridDelegate: SliverGridDelegateWithMaxCrossAxisExtent(
mainAxisSpacing: 10.0, maxCrossAxisExtent: 200.0),
shrinkWrap: true,
scrollDirection: Axis.vertical,
physics: ClampingScrollPhysics(),
children: List.generate(recipies.length, (index) {
return GridTile(
child: RecipieTile(
title: recipies[index].label,
imgUrl: recipies[index].image,
desc: recipies[index].source,
url: recipies[index].url,
));
})),
),
],
),
),
)
],
),
);
}
}
class RecipieTile extends StatefulWidget {
final String title, desc, imgUrl, url;
RecipieTile({this.title, this.desc, this.imgUrl, this.url});
@override
_RecipieTileState createState() => _RecipieTileState();
}
class _RecipieTileState extends State<RecipieTile> {
_launchURL(String url) async {
print(url);
if (await canLaunch(url)) {
await launch(url);
} else {
throw 'Could not launch $url';
}
}
@override
Widget build(BuildContext context) {
return Wrap(
children: <Widget>[
GestureDetector(
onTap: () {
if (kIsWeb) {
_launchURL(widget.url);
} else {
print(widget.url + " this is what we are going to see");
Navigator.push(
context,
MaterialPageRoute(
builder: (context) => RecipeView(
postUrl: widget.url,
)));
}
},
child: Container(
margin: EdgeInsets.all(8),
child: Stack(
children: <Widget>[
Image.network(
widget.imgUrl,
height: 200,
width: 200,
fit: BoxFit.cover,
),
Container(
width: 200,
alignment: Alignment.bottomLeft,
decoration: BoxDecoration(
gradient: LinearGradient(
colors: [Colors.white30, Colors.white],
begin: FractionalOffset.centerRight,
end: FractionalOffset.centerLeft)),
child: Padding(
padding: const EdgeInsets.all(8.0),
child: Column(
crossAxisAlignment: CrossAxisAlignment.start,
children: <Widget>[
Text(
widget.title,
style: TextStyle(
fontSize: 13,
color: Colors.black54,
fontFamily: 'Overpass'),
),
Text(
widget.desc,
style: TextStyle(
fontSize: 10,
color: Colors.black54,
fontFamily: 'OverpassRegular'),
)
],
),
),
)
],
),
),
),
],
);
}
}
class GradientCard extends StatelessWidget {
final Color topColor;
final Color bottomColor;
final String topColorCode;
final String bottomColorCode;
GradientCard(
{this.topColor,
this.bottomColor,
this.topColorCode,
this.bottomColorCode});
@override
Widget build(BuildContext context) {
return Padding(
padding: const EdgeInsets.all(8.0),
child: Wrap(
children: <Widget>[
Container(
child: Stack(
children: <Widget>[
Container(
height: 160,
width: 180,
decoration: BoxDecoration(
gradient: LinearGradient(
colors: [topColor, bottomColor],
begin: FractionalOffset.topLeft,
end: FractionalOffset.bottomRight)),
),
Container(
width: 180,
alignment: Alignment.bottomLeft,
decoration: BoxDecoration(
gradient: LinearGradient(
colors: [Colors.white30, Colors.white],
begin: FractionalOffset.centerRight,
end: FractionalOffset.centerLeft)),
child: Padding(
padding: const EdgeInsets.all(8.0),
child: Column(
children: <Widget>[
Text(
topColorCode,
style: TextStyle(fontSize: 16, color: Colors.black54),
),
Text(
bottomColorCode,
style: TextStyle(fontSize: 16, color: bottomColor),
)
],
),
),
)
],
),
),
],
),
);
}
}
fonts:
- family: Overpass
fonts:
- asset: assets/fonts/overpass_bold.otf
- family: OverpassRegular
fonts:
- asset: assets/fonts/overpass_regular.otf
import 'dart:async';
import 'dart:io';
import 'package:flutter/foundation.dart';
import 'package:flutter/material.dart';
import 'package:webview_flutter/webview_flutter.dart';
class RecipeView extends StatefulWidget {
final String postUrl;
RecipeView({@required this.postUrl});
@override
_RecipeViewState createState() => _RecipeViewState();
}
class _RecipeViewState extends State<RecipeView> {
final Completer<WebViewController> _controller =
Completer<WebViewController>();
String finalUrl ;
@override
void initState() {
// TODO: implement initState
super.initState();
finalUrl = widget.postUrl;
if(widget.postUrl.contains('http://')){
finalUrl = widget.postUrl.replaceAll("http://","https://");
print(finalUrl + "this is final url");
}
}
@override
Widget build(BuildContext context) {
return Scaffold(
body: Container(
child: Column(
children: <Widget>[
Container(
padding: EdgeInsets.only(top: Platform.isIOS? 60: 30, right: 24,left: 24,bottom: 16),
width: MediaQuery.of(context).size.width,
decoration: BoxDecoration(
gradient: LinearGradient(
colors: [
const Color(0xff213A50),
const Color(0xff071930)
],
begin: FractionalOffset.topRight,
end: FractionalOffset.bottomLeft)),
child: Row(
mainAxisAlignment: kIsWeb
? MainAxisAlignment.start
: MainAxisAlignment.center,
children: <Widget>[
Text(
"AppGuy",
style: TextStyle(
fontSize: 18,
color: Colors.white,
fontFamily: 'Overpass'),
),
Text(
"Recipes",
style: TextStyle(
fontSize: 18,
color: Colors.blue,
fontFamily: 'Overpass'),
)
],
),
),
Container(
height: MediaQuery.of(context).size.height - (Platform.isIOS ? 104 : 30),
width: MediaQuery.of(context).size.width,
child: WebView(
onPageFinished: (val){
print(val);
},
javascriptMode: JavascriptMode.unrestricted,
initialUrl: finalUrl,
onWebViewCreated: (WebViewController webViewController){
setState(() {
_controller.complete(webViewController);
});
},
),
),
],
),
)
);
}
Reference
이 문제에 관하여(플래터로 메뉴 프로그램 만들기🍳), 우리는 이곳에서 더 많은 자료를 발견하고 링크를 클릭하여 보았다 https://dev.to/theindianappguy/build-a-recipe-app-with-flutter-4iko텍스트를 자유롭게 공유하거나 복사할 수 있습니다.하지만 이 문서의 URL은 참조 URL로 남겨 두십시오.
![]() 우수한 개발자 콘텐츠 발견에 전념
(Collection and Share based on the CC Protocol.)
우수한 개발자 콘텐츠 발견에 전념
(Collection and Share based on the CC Protocol.)
좋은 웹페이지 즐겨찾기
